The basic setup is very simple - just a domain, a plane as an emitter and a vortex force field. This tutorial assumes that you are already familiar with the Blender 2.5 smoke simulation, so let's dive right in!
The effect is actually two different things combined - an emitter with changing temperature difference to blow the smoke in two directions and a vortex field to create the scary drum of smoke.
At the beginning of the video you see puffs of smoke towards the left and the right side - they are acutally going down- and upwards. It's just that the camera is rotated 90 degrees. So in order to begin, create a domain and make it longer on the Z-axis. Place the camera on the Y-axis and rotate it by 90° on the X-axis and -90° on the Y-axis. If you now pull it back on the Y-axis, you get a perfect view of your domain. The following picture shows my setup with the domain selected:
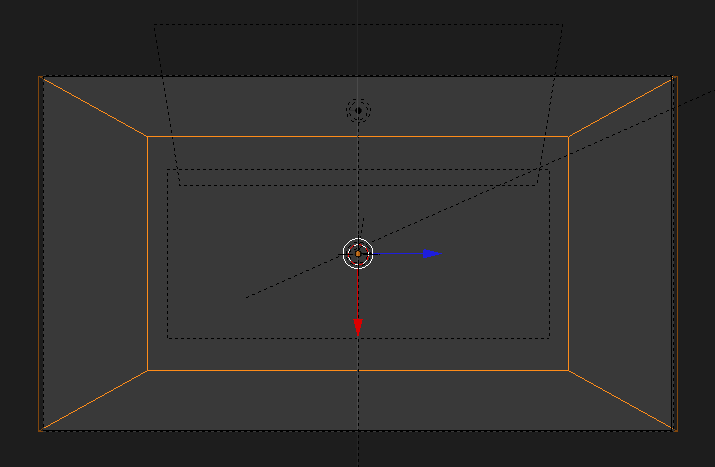
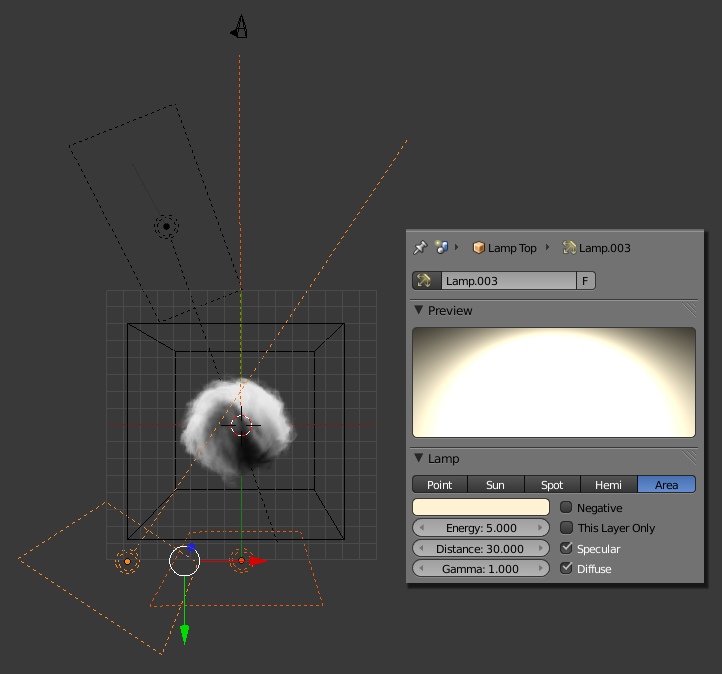
As you can see, the camera view just covers the domain so the walls will be visible as invisible borders for the smoke drum in the animation. In the back you can see two area lights which I used to illuminate the setting. I'm using one directly from the back and one from the top-back to get the backlit-look of the smoke. There's also one from front-side to enhance the details in the smoke. We'll look further into the settings of the lamps later on.
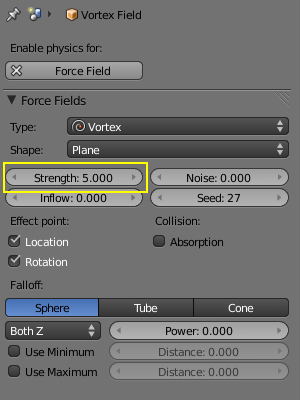
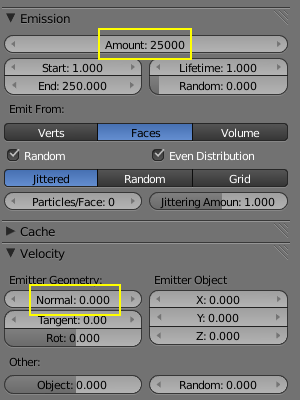
The cool thing about the setup you got now is that you don't need to do much anymore. Just hit Alt+A and add a plane. I applied a subsurf-modifier with a resolution of 2 to the plane in order to get more rounded puffs. Next hit Alt+A again and add a vortex force field. The scene is now completely set up so let's move on to the settings. Neither for the force field, nor for the particle system of the emitter much needs to be changed. For the force field, just set the strenght to 5. For the particle system, raise the amount of particles to 2.500 and reduce Emitter Geometry under Velocity to 0. This way the particles will be born and die directly where the plane is located and not slightly near it.
The effect of puffs to the left and right could of course also be achieved by using Initial Velocity in the settings of the flow object and animating the Velocity of the particles. But the approach taken here is different. The Temperature Difference of the flow object changes from negative to positive values which results in alternating falling and rising smoke. Using the technique shown in my tutorial on mixing smoke of two different colors I colored the above example in blue for cold and red for hot smoke. Smoke of normal temperature is white. Because the cold smoke gets warmer due to the ambient temperature and the warm smoke colder, the entire drum ends up as white smoke:
To get the desired effect you just need to animate the Temperature Difference of the flow object. I used the maximum values of -10 and 10 and let the change take part over a span of 10 frames.
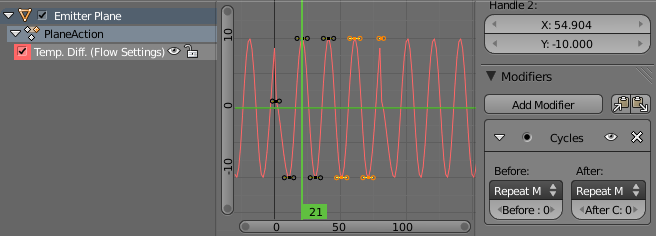
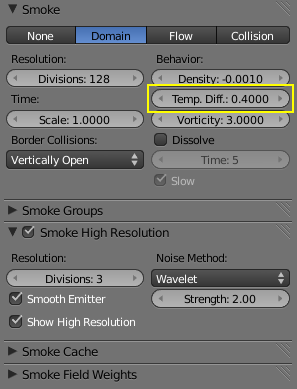
In the figure above you can see how the Temperature Difference can be animated making use of the Cycles modifier to get an infinite curve. The dent in the curve is just a little sloppyness that won't change the end result. If you bake now, you should not notice too much of a difference in the rising and falling yet. You need to change the Temperature Difference of the domain, too! The higher you set the value, the stronger the effect of the rising and falling smoke will be. I chose a rather strong value of 0.4 so the effect can be seen a little better. The Voxel Data texture for the domain uses the usual settings, but the material get a few tweaks. Beware that the number of Divisions for the Domain is set to 128. The lower you set the value, the less the effect will work. I got good results starting from as low as 64. The default setting of 32 Divisions most certainly won't work! Thanks to the user battlebyte from blend.polis forums for pointing this out.
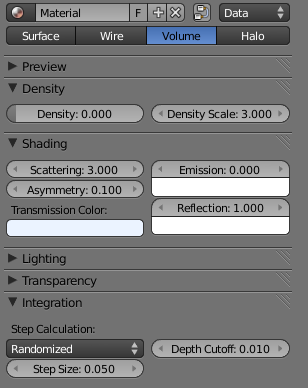
The Transmission Color of the Volume Material is set to a light blue (Hex: "EBF3FF") in order to set the smoke apart from the lighting which we will color slightly yellowish. The Asymmetry of 0.100 helps adding contrast. This works because one lamp is placed directly to the opposite of the camera's point of view. An example of how the values for Asymmetry work in such a situation is shown below:
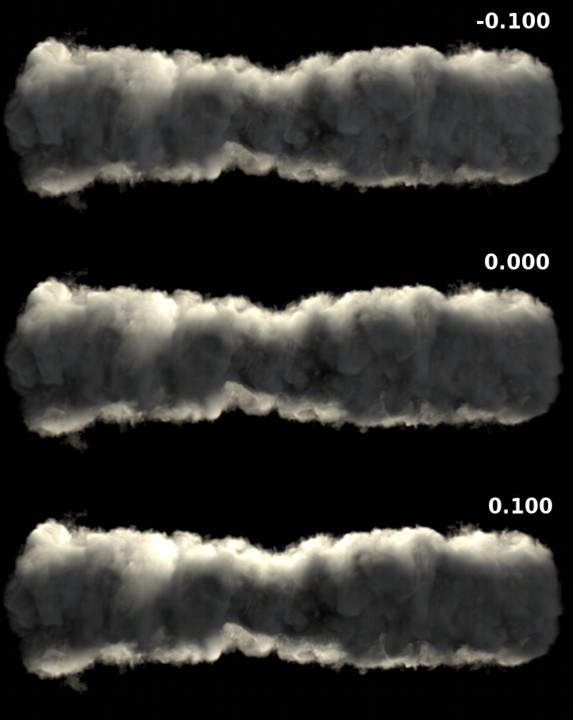
The last thing you need to tweak is the lighting. Before doing so, you should bake the smoke simulation. The following image shows the lighting setup from the top with the settings for the two area lights on the back (Hex color "FFF3D4"). The third area light emits white light with an Energy value of 0.3.
Now after rendering the animation you should have a really cool drum of smoke that's growing bigger and nastier over time. This effect is surely useful for quite a few things. Imagine a deserted street with such a wall of smoke coming towards ya! My demo has a length of 250 frames and stops right when things get interesting on the left side. At the end of this tutorial you can download the Blendfile, maybe you should run the simulation a little longer to see what's happening. Also take a look at how the smoke starts to twist at the beginning. There's a thin line on the left from which the rotation of the smoke emerges. That's actually also a usual behaviour of the vortex fields when working with particles and some of them are stuck in the middle.
Download the finished Blendfile!
Once you are finished with this effect, maybe you want to check out this quick tip on how to adjust the setup slightly in order to rebuild another one of Nion's cool effects! If you liked the tutorial, why not drop a comment below? And if you like the effect, drop a comment over at Nion's page!
