

")
This is an example from the BlenderDiplom eBook: The Cycles Encyclopedia
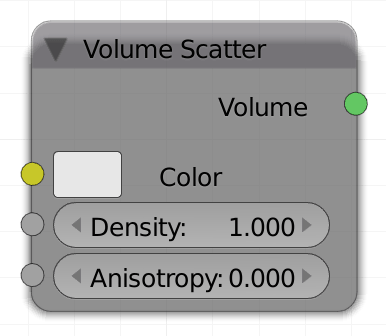
Volume Scatter
When light passes through certain objects, it may seem as if the light itself is actually visible. A great example of this effect is a very dusty room with sunlight streaming in from a window. Similar to how the light from that window reflects off all of the tiny dust particles and appears to form a shape, volume scattering in Cycles can be thought of as light reflecting off of many infinitely small pieces of dust. The possibilities of the volume scatter shader include anything from sunbeams (a.k.a. god rays), to thick clouds of fire and smoke.
Color
Simply controls what color or light will be reflected by the volume. The input can be an RGB or any texture.
Density
Determines how thick the volume appears to be. You can think of this as adding more “dust” to our dusty room example. If you want to vary the density of your volume in different areas, use a map for the density. A map could be a 3D (procedural) texture or the factor from a smoke or fire simulation.
Anisotropy
Anisotropy is the scattering direction depending on which way the light ray is moving. Positive values let the ray scatter in the direction it is traveling, while negative values cause the ray to scatter opposite of its travel direction. So in an evenly lit scene it does not make that much of a difference. However it is important to understand it anisotropy as it can be tricky without first seeing its effects, so let’s take a look at some examples:

Fig. 2.17) Volume scatter with anisotropy. For positive values (left), rays mostly get scattered along the direction of the ray that entered the volume. Negative values mostly scatter into the opposite direction (right). Anisotropy of 0.0 (center) will result in random scatter directions. Depending on the density, rays might not get scattered at all.
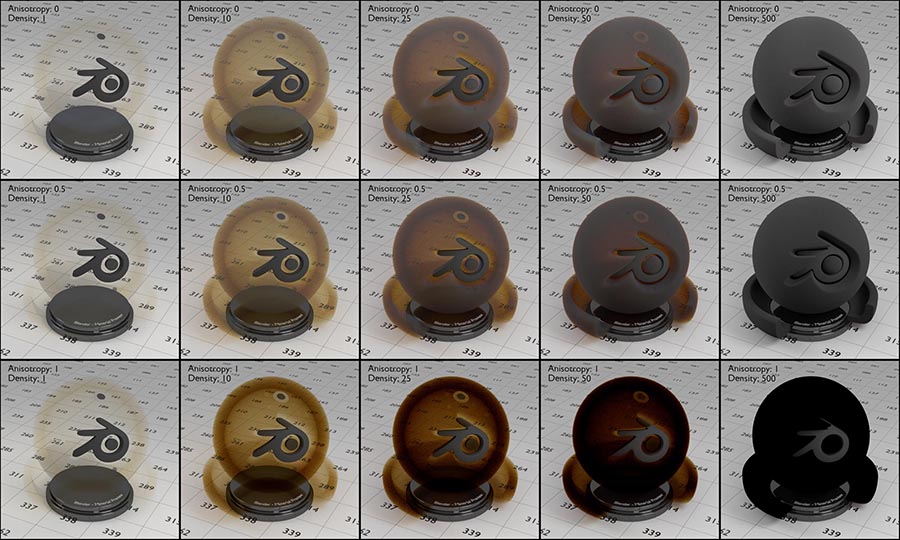
Fig. 2.18) Renderings with a volume scatter material. From left to right the density was increased, the values were: 1, 10, 25, 50, 500. From top to down the anisotropy was set to 0, 0.5 and 1. Notice that a volume scatter material with a high density looks fairly similar to the diffuse shader. The color of the shader is the same powder blue I use for all of the test renderings, the appearing color however is its complementary color, since blue got scattered away. The grey parts are where the scattered powder blue mixes with it’s complementary color, which is most visible for high densities.

Fig. 2.19) Volume scatter material with no color but 80% grey instead. Since there is no color, there is no complementary color, either (compare this to Fig. 2.18).
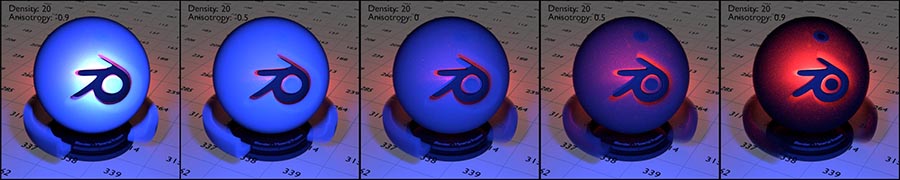
Fig. 2.20) Renderings with a volume scatter material. From left to right the anisotropy was increased. The values are -0.9, -0.5, 0, 0.5, 0.9. For this scene the only light sources are two point lights: a blue one in front of the object and a red one right behind it. Notice how negative anisotropy results in an almost reflective appearance of the volume while positive values cause the light behind the object to tint it. Compare fig. 2.18.
![]() Hint: If you want to color a scattering volumetric material like dust or smoke, combine the volume scatter shader with a volume absorption shader using an add(!) shader node:
Hint: If you want to color a scattering volumetric material like dust or smoke, combine the volume scatter shader with a volume absorption shader using an add(!) shader node:
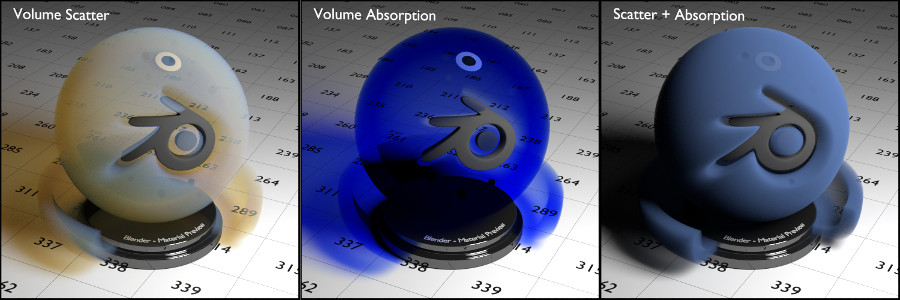
Fig. 2.21a) The demo scene with just one white area light on the right. With just volume scatter (left), the input color is only visible on parts of the volume where the camera ray got scattered directly into the light. The other parts of the volume and especially the shadow are tinted in the complementary color. In the middle only volume absorption was used, tinting both the object and the shadow in the input color with thicker parts being darker. On the right volume scatter and volume absorption were combined using the node setup from below. Since inside the volume both scattering and absorption of light are taking place, the result looks way more natural. Notice the shadow becoming gray because all color is either scattered or absorbed now.
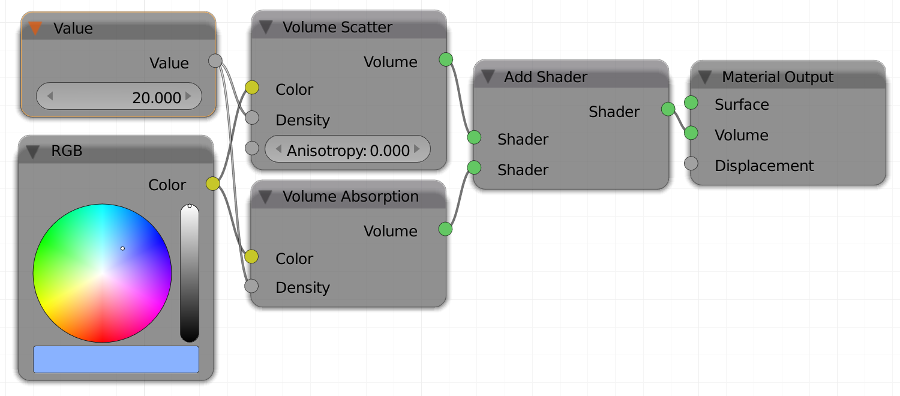
Fig. 2.21b) The node setup used for the scatter + absorption shader on the right of Fig. 2.21a).